Hello! This is Joey, one of your friendly TAs. I'm here to introduce you to Eclipse.
Navigation
- What is Eclipse?
- Installation
- Set Up Your Code
- A Tour of Eclipse
- Satisfying the Style Guide
- Adding Libraries
- Other Features
- Troubleshooting
A. What is Eclipse?
Up through this point in your programming career, you've likely typed your programs in a text editor such as Emacs, Vim, or Sublime Text. I'd now like to introduce you to Eclipse, which is an IDE (integrated development environment). For your purposes, you can think of an IDE as a text editor with a bunch of extra fancy features.
Eclipse is a free and open source IDE built specifically for Java development (though it can be adapted to work with other languages).
Why Use Eclipse?
Don't write off Eclipse's "extra fancy features" as gimmicks; they are quite powerful and can dramatically increase the efficiency of your programming.
One of Eclipse's most immediately practical features is its automatic error checking. Similar to Microsoft Word, it underlines errors in red as you type:
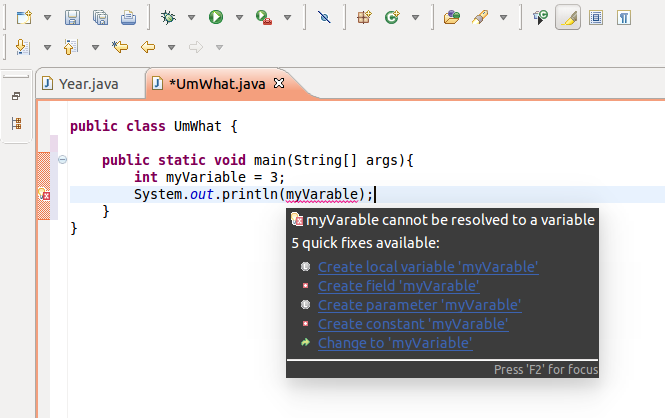
You can even hover over the error to get a description of it and suggested fixes!
Of course, Eclipse can't find every bug in your program, but it will notify you of all errors that would be caught when compiling your program (these are called compile-time errors). This is because Eclipse is constantly and automatically compiling your program in the background as you type it. That's right: using Eclipse you won't need to compile your programs manually anymore! In fact, in order to run your program, all you have to do is hit the green run button, and it will run within Eclipse:
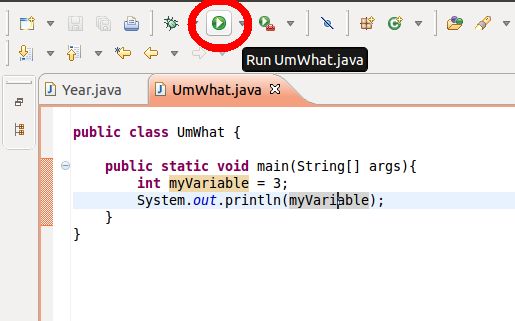
Eclipse has a ton of other useful features, but I'll introduce them to you slowly so you don't get overwhelmed. I hope these two features alone are compelling enough to convince you to use Eclipse. They should greatly reduce your debugging time: no more compiling and running your code again and again just to discover you made a tiny error like misspelling a variable or forgetting a semicolon.
You're certainly not required to use Eclipse to type your programs in this class. Although Eclipse has a lot of great features, it has so many that there's a bit of a learning curve in using it, so feel free to use Emacs or Vim if you prefer their simplicity. However, I strongly recommend Eclipse. Personally, I've found it invaluable for programming in Java. And, although you won't run into this problem so much in 61b, I've found Eclipse absolutely essential for managing larger projects.
I've written this document to help get you over the learning curve faster. It's also meant to be a reference, so if you ever forget how to do something you can return here and look it up.
Okay: if I've sold you on Eclipse, read on, and let's get it set-up!
B. Installation
On the lab machines
Eclipse is already installed! Just type eclipse in the terminal to start it up.
On Ubuntu
Just type sudo apt-get install eclipse in the terminal to install. Then type eclipse in the terminal afterward to start it up.
On Mac OS X
Download the "Eclipse IDE for Java Developers" from the eclipse website. Extract the archive and drag the extracted eclipse folder into your Applications. If you'd like, you can go into the eclipse folder and drag Eclipse.app into your dock.
On Other Operating Systems
You're on your own. Hopefully you know how to install programs on your computer. You'll want to visit the eclipse website and download Eclipse from there. Select the one for Java, of course!
Note: As of writing, Linux users should stick to Eclipse version 3.x while Windows and Mac users should use Eclipse version 4.x. I use 3.x, so if you're using 4.x it may be that your graphics look slightly different than the ones in the pictures I post in this document. Don't worry! It should basically work the same.
C. Set Up Your Code
In Eclipse, all your code must be organized into projects, which you can think of as folders that contain a bunch of related code. Projects must then be further grouped into a workspace, which for now you can think of as another folder. There are a lot of different opinions on the best ways to organize workspaces and projects. However, for this class, you're forced to use the structure of the git repo we gave you, so let's adapt Eclipse to work with that structure. I believe the cleanest way for you to do this is to:
- Make the top level folder of your local git repo into a single workspace, and
- Make each of the assignment folders (lab1, lab2, lab3, hw1, etc.) into individual projects in that workspace
As an example, let's get your lab1 code working in Eclipse.
Setting up lab1
When you first open Eclipse, it'll ask you to choose a location for your workspace. Select the folder of your local git repo. If you already selected a different workspace on accident, no worries, just go to File > Switch Workspace and change it.
(If you accidentally set another workspace as your default, to change the default go to Window > Preferences > General > Startup and Shutdown > Workspaces. Then check Prompt for workspace on startup. Then restart Eclipse, select the new workspace, and select the option to make it default.)
In addition, the first time you open Eclipse you'll likely find a screen that looks something like this:
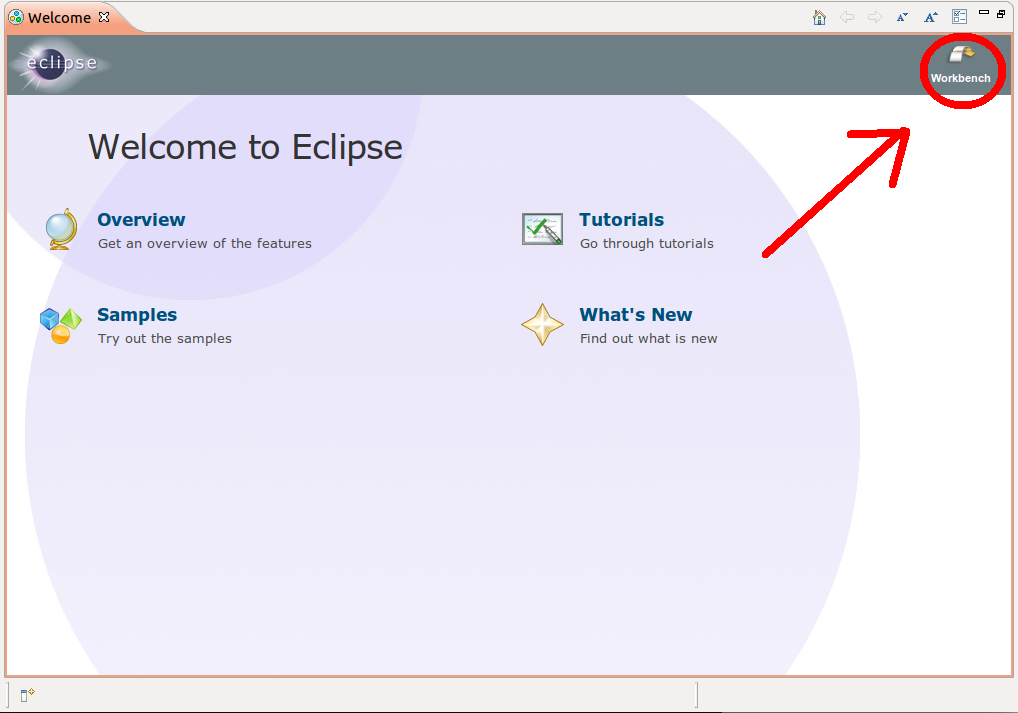
Select Workbench to be taken to a screen that looks more like this:

This is where we'll be doing most of our work.
Now let's try to edit code from lab1 in Eclipse. However, in order to make use of all of Eclipse's features while typing, you'll first have to add your code to a project. Go to File > New > Java Project. (If you don't see this option exactly (e.g. you only see Project and not Java Project), you may be in the wrong perspective. Try Window > Open perspective > Java.)
A new window pops up. In Project name, type in lab1. Type it in exactly with the name of the folder already on your computer. If you do this, the remainder of the options for creating a project should grey out. This is because you're creating a project out of an existing folder, so there's nothing left to specify.
(Side note: If you want to create a new project and the folder doesn't already exist (like if you're working on something that isn't a lab or homework for this class), consider checking the option 'Use project folder as root for sources and class files' instead of 'Create separate folders for sources and class files'. Although this is not the typical way that people organize Java files, this is what matches the structure that this class uses, so it will be the most familiar to you.)
D. A Tour of Eclipse
Opening Code
All right! We should have your lab1 code all ready to go in Eclipse. There's a lot on the screen, so let's go over what various things do.
On the left you should see something called the package explorer (if it's not there, go to Window > Show View > Package Explorer).
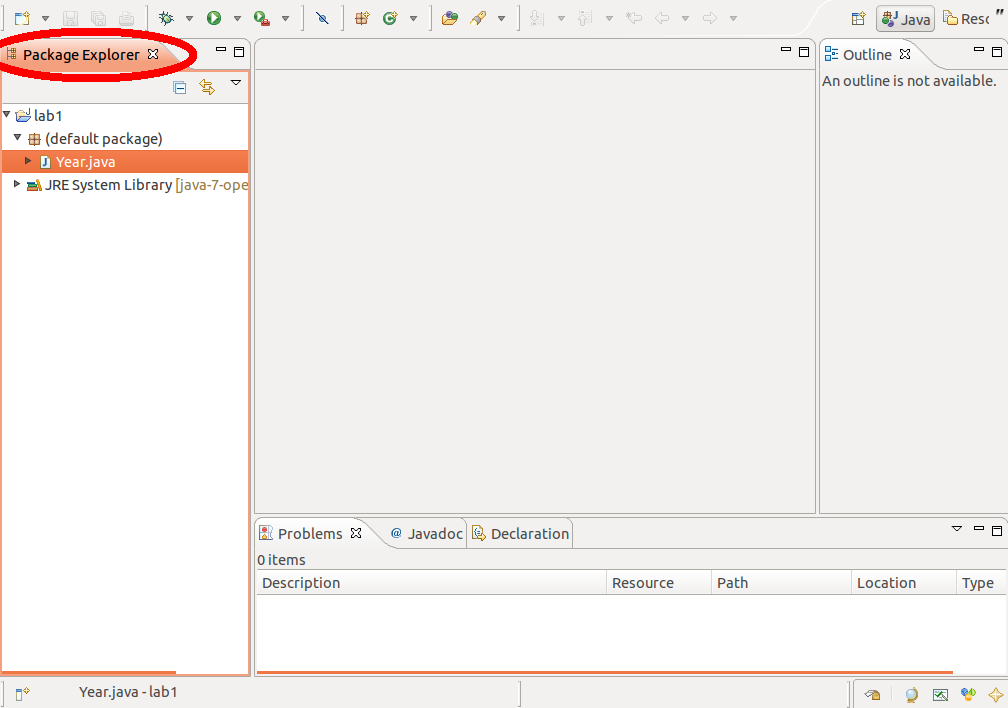
The package explorer allows you to browse through and open all your files in your projects. Expand the lab1 project, and the default package. You should see your code. Click on it to open it up.
(Important: If you move around files outside of Eclipse (like using the terminal), the package explore won't automatically update their positions. You will have to refresh it. Right-click on the changed project and select Refresh. (If you would prefer Eclipse to automatically refresh, try Window > Preferences > General > Workspace and then change the refresh settings there.)
Now you can type stuff. Try making some deliberate errors to see if Eclipse underlines them in red (maybe add a line at the top of main that doesn't end in a semi-colon). If it does, it looks like you've gotten things set-up right. If not, (and your code actually has an error), there might be a problem.
Running Code
Now let's try running our code. Click on the green circle with an arrow in it. If this doesn't work, try clicking on the little black arrow next to it, then selecting Run As > Java Application.
The following text should appear in a tab called the console:

The console is where text that your program prints out appears.
(Side note: Both the console and the package explorer are known as views. You can move them around the screen as you choose, minimize them, maximize them, or lock them in place. If a view ever disappears and you don't know how to get it back, you can always go to Window > Show View and then select it. There are buttons to open some of them in the margins, too)
Command Line Arguments
The reason Year.java printed out Please enter command line arguments. is that, well, we didn't enter any command line arguments. Remember when we ran it from the terminal, we had to tell the program which year we wanted to use. But how do we do this in Eclipse, if we don't type anything when we run a program? It turns out there is a separate menu for adding in command line arguments. Let's go check it out now.
Click on the little black arrow next to the run button, and select Run Configurations.... This will open up a new mini window. Click on the Arguments tab, then in the Program Arguments section, type your argument (for example, type in 2000). Now click Apply, and then Run. It will run the program using that argument.
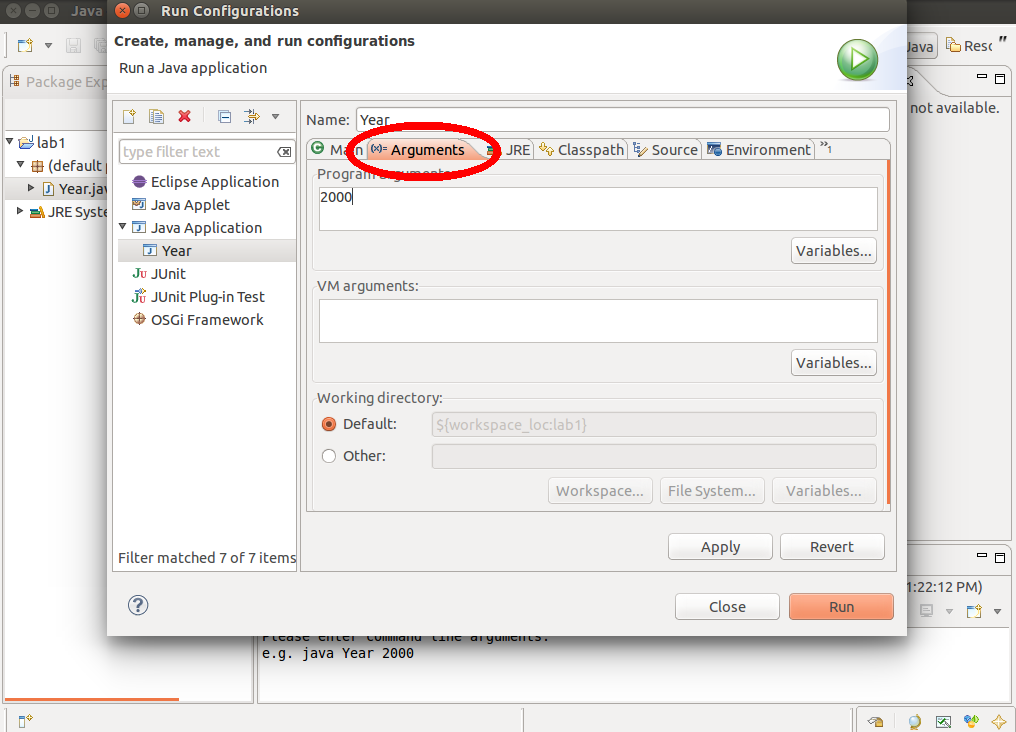
What we just ran was equivalent to typing java Year 2000 at the terminal. But notice that we omitted java and the name of the program Year. You must omit these when using Eclipse.
Phew! Although this seems like it was a lot of work to use command line arguments, actually, eventually you'll find that Eclipse's method will save you a lot of time. Here's why: Eclipse actually saved your command line argument so you can run it again without typing. To see this, click on the little black arrow next to the run button. Above Run As and Run Configurations, you should see another option (probably Year). Click it, and it should re-run your code with the argument you just used!
The real utility is that you can save various different arguments you might want to use under different names. Go back to the run configurations menu, and notice there's a Name box at the top that probably contains something like Year. Try changing the name to something descriptive, such as Checking 2000, and then hit Apply.
If we want to run with a different argument instead, such as 2001, we can create another run configuration for it. In the Run Configurations menu, select the New launch configuration button in the upper left. Then change its argument to 2001 and give it a new name like Checking 2001. Then click Apply and Run to run it.
Now click the little black arrow next to the green run button again. You should see an option for Checking 2000 and Checking 2001. So you now can switch between running either one very quickly. Later on, when you encouter programs that require long strings of command line arguments, this can save you a ton of re-typing!
Creating New Code
Now that we know how to edit and run code, let's learn to how to create a new java file. Easy enough, just go to File > New > Class. A new window will pop up. The only information you need to fill out is Name. Then click Finish. That's it!
Technically, you need to fill out the Source folder section as well, but if you have your current project selected, this should be filled out by default for you. In addition, you may notice that Eclipse tells you it's not a good idea to leave the Package section blank; true enough, but for now just ignore it. We'll get to packages later in the class.
E. Satisfying the Style Guide
Your code in 61B is required to meet certain style conventions. It turns out that Eclipse can be used to satisfy many of these automatically! I'll give you tips on getting that set up at a later date.
Right now, however, it's important that we at least fix one thing. By default, Eclipse uses tabs, but the style guide forces you to use no tabs at all, and instead to replace them all with spaces. Let's change Eclipse's behavior.
Go to Window > Preferences > Java > Code Style > Formatter. Create a new active profile. Give it a descriptive name like "61B Format", intialize it with Eclipse [built-in], then hit OK, opening the edit dialog. Go to the Indentation tab and set the tab policy to "Spaces only". Hit OK. Now make sure you have your 61B profile selected, hit Apply, and hit OK.
From now on, Eclipse will use spaces to auto-indent. Also, whenever you press tab, it will insert 4 spaces instead, so feel free to use tab on your computer.
If you have code that already had tabs in it, it's now easy to change them all to spaces. Simply navigate to the file and hit Ctrl + Shift + f. This immediately takes all the code and formats according to the formatter profile you have selected. It'll also fix incorrect tabbing with methods and loops and conditionals and such, among other things.
F. Adding Libraries
Sometimes we'd like to give our projects access to other code written by other people that we downloaded. Brief instructions on how to do this are given in lab1c, but here we provide some more thorough instructions for setting this up neatly.
Let's add the .jar files you downloded in lab1c. In order to access these in Eclipse, we must add them to each project that wants to use them. To recap, here's the basic thing to do: Right click on the project that needs access, then go to Build Path > Add External Archives.... Then select the .jar files you want and hit okay. You should now be able to access them all within the project. That's all you really need.
However, it's a little annoying to add all of the .jar files in every project, so one thing we can do to facilitate the process is to create a user library. This is essentially a grouping of .jar files, so all we have to do is add in the one user library instead of all the .jar files.
As an example, let's let's make a user library out of all the .jar files you downloaded in lab1c. Go to Window > Preferences > Java > Build Path > User Libraries. Create a new one. Give it a descriptive name such as "61B_LIB". Now select Add External JARs... and select all of the .jar files you downloaded in lab1c. Hit OK.
That was a bit of a hassle, but it'll now be easier to add these .jar files into a project. Right click on the project, then go to Build Path > Add Library. Select User Library and hit Next>. Check the user library you created and finish to add all the .jar files at once. That's it!
G. Other Features
As I mentioned earlier, Eclipse has a number of other features that can make your programming life much more convenient. So I don't overwhelm you, I won't list off any here. Instead, I'll be drip feeding them to you with a "Weekly Eclipse Tip" feature. Look out for it on piazza! Of course, feel free to explore Eclipse yourself and to google things in the meantime.
H. Troubleshooting
If you're following the directions here carefully and things aren't turning out as expected... I'm not surprised. Eclipse can seem really finicky when you're first getting started with it. Try googling the problem, or asking one of your friends. If that fails, you could attempt a piazza post, but be aware that issues with Eclipse may be difficult to deal with over piazza because Eclipse is so visual. So if that fails, I recommend visiting office hours. I can't speak for other staff members' experience with Eclipse, but you can definitely come to mine. With that said: Good luck, and happy coding!