Table of Contents
- Introduction
- Task 1: BoundedQueue
- Task 2: AbstractBoundedQueue
- Task 3: ArrayRingBuffer
- Task 4: GuitarString
Introduction
In this homework, you will learn how to write and use packages, as well as get some hands-on practice with interfaces and abstract classes. We'll also get an opportunity to implement a simple data structure as well as an algorithm that is easy to implement given that data structure.
As mentioned in class, a package is a namespace that organizes a set of related classes and interfaces. Conceptually you can think of packages as being similar to different folders on your computer. When you have complex programs, it is a good idea to organize it into different packages.
For this assignment, we'll create a synthesizer package intended for use by programs that want to simulate the sound of guitar strings.
The synthesizer package has four components:
BoundedQueue, an interface which declares all the methods that must be implemented by any class that implementsBoundedQueue.AbstractBoundedQueue, an abstract class which implementsAbstractBoundedQueue, capturing the redundancies between methods inBoundedQueue.ArrayRingBuffer, a class which extendsAbstractBoundedQueueand uses adouble[]as the actual implementation of theBoundedQueue.GuitarString, which uses anArrayRingBufferto implement the Karplus-Strong algorithm to synthesize a guitar string sound.
We've provided you with skeleton code for ArrayRingBuffer and GuitarString, but you'll need to implement the other two .java files from scratch. In this HW, we'll work our way down the hierarchy from most abstract to most concrete.
Note: While it'd probably be better design to make only the GuitarString class public (since people using synthesizers don't really care about AbstractBoundedQueues), we'll be leaving all of our classes public for this HW since we won't cover what we'd need until Friday.
Task 1: Creating an Interface
Review: What is an Interface? Why would you want one?
As discussed in class, an interface is a formal contract between a class and the outside world. If your class claims to implement an interface, then all methods defined by that interface must appear in your class (or somewhere in your superclass) before the class will successfully compile.
This is a way of enforcing promised behavior.
All methods that you declare or define are automatically public and abstract (even if you omit the public keyword).
Your Task
We will start by defining a BoundedQueue class. The BoundedQueue acts like a line (or queue) in a super market. Items can be enqueued (arrive at the back of the line), or dequeued (leave from the front of the line). Unlike supermarket lines, they have a fixed capacity, and nothing is allowed to enqueue if the line is full.
Create a file BoundedQueue.java in the synthesizer folder. Your BoundedQueue interface should contain the following public abstract methods:
int capacity();          // return size of the buffer
int fillCount();         // return number of items currently in the buffer
boolean isEmpty();       // is the buffer empty (fillCount equals zero)?
boolean isFull();        // is the buffer full (fillCount is same as capacity)?
void enqueue(double x);  // add item x to the end
double dequeue();        // delete and return item from the front
double peek();           // return (but do not delete) item from the front
For example, given an empty BoundedQueue of capacity 4, the state of the queue after each operation is shown below:
isEmpty()       //                       (returns true)
enqueue(9.3)    // 9.3
enqueue(15.1)   // 9.3  15.1
enqueue(31.2)   // 9.3  15.1  31.2
isFull()        // 9.3  15.1  31.2       (returns false)
enqueue(-3.1)   // 9.3  15.1  31.2  -3.1
isFull()        // 9.3  15.1  31.2  -3.1 (returns true)
dequeue()       // 15.1 31.2  -3.1       (returns 9.3)
peek()          // 15.1 31.2  -3.1       (returns 15.1)
Of course, your BoundedQueue.java file won't actually do anything (since it's an interface), but it will define the contract that any BoundedQueue must follow.
Make sure to decare this interface as part of the synthesizer package. The syntax for declaring yourself to be part of a package is package <packagename>;. For example, if you are part of
the animal package, the top of your file should have a package animal; line.
Before moving on, ensure that BoundedQueue compiles: javac -g BoundedQueue.java.
If you're stuck, see this lecture 11 .java file for an example of an interface declaration.
Task 2: Creating an Abstract Class
Review: What is an Abstract Class? Why would you want one?
Methods and classes can be declared as abstract using the abstract keyword. Abstract classes cannot be instantiated, but they can be subclassed using the extends keyword. In 61B, we'll almost always use abstract classes as default implementations for interfaces, though they can be used for other reasons as well.
Abstract classes that implement interfaces will inherit all of the abstract methods from that interface. If a class includes any abstract methods (including any inherited methods), then the class itself must be declared abstract, as in:
public abstract class AbstractBoundedQueueAs an aside, it is also possible to declare additional abstract methods. To do so, the method must be defined with the abstract keyword and without an implementation (without braces, and followed by a semicolon), like this:
abstract void moveTo(double deltaX, double deltaY);We won't explicitly define any methods as abstract in HW4, but we will see this idea in lab 6.
When an abstract class is subclassed by a non-abstract class (e.g. ArrayList subclasses AbstractList), the subclass must provide implementations for all of the abstract methods in its parent class or else they won't compile.
Your Task
Create a new abstract class in a .java file called AbstractBoundedQueue.java that implements BoundedQueue. Your AbstractBoundedQueue class should have the following methods and fields (field is just another word for variable):
protected int fillCount;
protected int capacity;
public int capacity()
public int fillCount()
public boolean isEmpty()
public boolean isFull()
public abstract double peek();
public abstract double dequeue();
public abstract void enqueue(double x);
Note that peek, dequeue, and enqueue are inherited from BoundedQueue, so you do not need to declare these explicitly.
If you're stuck, see AbstractXList from lecture 10 for an example of an abstract class that provides default methods for an interface. This class provides a default implementation for the XList class.
If you're having trouble compiling your AbstractBoundedQueue.java file, because the compiler can't find BoundedQueue.class, try compiling with:
javac BoundedQueue.java AbstractBoundedQueue.javaor if you want to compile ALL java files in a folder, you can just do:
javac *.javaThis is a minor quirk in the way the javac compiler behaves when compiling from inside package directories.
Side note: When to Use a Interface versus Abstract Class
In practice, in can be a little unclear when to use an interface and when to use an abstract class. One mostly accurate metaphor that might help is that you can think of an interface as defining a "can-do" relationship, whereas an abstract class defines an "is-a" relationship. The difference can be subtle, and you can often use one instead of the other. In practice, a well-designed Java library will have a hierarchy of interfaces, which are extended by abstract classes that provided default implementations for some methods, and which are in turn ultimately implemented by concrete classes. A good example is the Collection interface: It extends Iterable (which is its superinterface), and is implemented by many subinterfaces (i.e. List, Set, Map), which in turn have their own abstract implementations (AbstractList, AbstractSet AbstractMap). However, for smaller programs, the hierarchy is often stubbier, sometimes starting with an abstract class. For example, we could have just started with AbstractBoundedQueue and skipped BoundedQueue altogether.
Task 3: ArrayRingBuffer
The ArrayRingBuffer class will do all the real work by extending AbstractBoundedQueue. That means we can happily inherit capacity(), fillCount(), isEmpty(), and isFull(),
but we need to implement all of the the abstract methods. In this part, you'll fill out ArrayRingBuffer.java. You'll need to rename the file from ArrayRingBuffer.java.skeleton to ArrayRingBuffer.java.
A naive array implementation of a BoundedQueue would store the newest item at position 0, the second newest item in position 1, and so forth. This is an inefficient approach, as we see in the example below, where the comments show entries 0, 1, 2, and 3 of the array respectively. We assume that the array is initializer to zero.
BoundedQueue x = new NaiveArrayBoundedQueue(4);
x.enqueue(33.1) // 33.1    0    0    0
x.enqueue(44.8) // 33.1 44.8    0    0
x.enqueue(62.3) // 33.1 44.8 62.3    0
x.enqueue(-3.4) // 33.1 44.8 62.3 -3.4
x.dequeue()     // 44.8 62.3 -3.4    0 (returns 33.1)
Note that the call to dequeue is very slowas it requires moving every single item to the left. For larger arrays this would result in unacceptable performance.
The ArrayRingBuffer will improve this runtime substantially by using the 'ring buffer' data structure. A ring buffer first starts empty and of some predefined length. For example, this is a 7-element buffer:

Assume that a 1 is written into the middle of the buffer (exact starting location does not matter in a ring buffer):

Then assume that two more elements are added — 2 & 3 — which get appended after the 1. Here, it is important that the 2 and 3 are placed in the exact order and places shown:
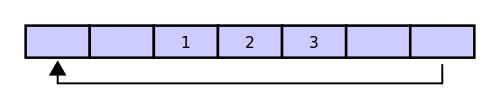
If two elements are then removed from the buffer, the oldest two values inside the buffer are removed. The two elements removed, in this case, are 1 & 2, leaving the buffer with just a 3:

If we then enqueue 4, 5, 6, 7, 8, 9, the ring buffer is now as shown below:
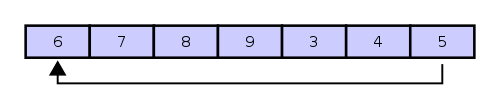
Note that the 6 was enqueued at the leftmost entry of the array (i.e. the buffer wraps around, like a ring). At this point, the ring buffer is full, and if another enqueue() is performed, then an Exception will occur. You will manually throw this Exception. See the section labeled Exceptions at the end of this HW for more.
We recommend you maintain one integer instance variable first that stores the index of the least recently inserted item; maintain a second integer instance variable last that stores the index one beyond the most recently inserted item. To insert an item, put it at index last and increment last. To remove an item, take it from index first and increment first. When either index equals capacity, make it wrap-around by changing the index to 0. Our skeleton file provides starter code along these lines. You're welcome to do something else if you'd like, since these variables are private and thus our tester will not be able to see them anyway.
Implement RingBuffer to throw a run-time exception if the client attempts to enqueue() into a full buffer or call dequeue() or peek() on an empty buffer. Again, we'll be covering exceptions on Monday, so hold off until then (or read ahead in HFJ).
Once you've fleshed out the TODOs, make sure ArrayRingBuffer compiles before moving on. Make sure to add tests TestArrayRingBuffer class (either before or after your write ArrayRingBuffer). TestArrayRingBuffer.java will not be graded. To run TestArrayRingBuffer you'll need to run the following command from your hw4 folder as described in this common package gotchas slide.
java synthesizer.TestArrayRingBufferWhile we're at it, here's a new rule: You're now welcome to share test code for HW and lab. You should continue to avoid sharing test code for projects. Feel free to put tests up on Piazza for this HW in the HW4 thread.
Task 4: Finishing up the Package
Finally, we want to flesh out GuitarString, which uses an ArrayRingBuffer to replicate the sound of a plucked string. We'll be using the Karplus-Strong algorithm, which is quite easy to implement with a BoundedQueue.
The Karplus-Algorithm is simply the following three steps:
- Replace every item in a BoundedQueue with random noise (double values between -0.5 and 0.5).
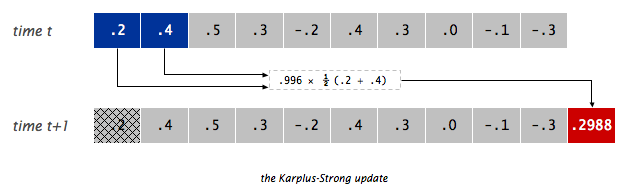
- Remove the front double in the BoundedQueue and average it with the next double in the BQ (hint: use
dequeue()andpeek()) multiplied by an energy decay factor of 0.996. - Play the double that you dequeued in step 2. Go back to step 2 (repeating forever).
Or visually, if the BoundedQueue is as shown on the top, we'd dequeue the 0.2, combine it with the 0.4 to form 0.2988, enqueue the 0.2988, and play the 0.2.
You can play a double value with the StdAudio.play() method. For example StdAudio.play(0.333) will tell the diaphragm of your speaker to extend itself to 1/3rd of its total reach, StdAudio.play(-0.9) will tell it to stretch its little heart backwards almost as far as it can reach. Movement of the speaker diaphragm displaces air, and if you displace air in nice patterns, these disruptions will be intepreted by your consciousness as pleasing thanks to billions of years of evolution. See this page for more. If you simply do StdAudio.play(0.9) and never play anything again, the diaphragm shown in the image would just be sitting still 9/10ths of the way forwards.
Rename GuitarString.java.skeleton to GuitarString.java. Complete 'GuitarString.java' so that it implements the Karplus-Strong algorithm.
The provided TestGuitarString class provides a sample test testPluckTheAString that attempts to play an A-note on a guitar string. You should hear an A-note when you run this test. If you don't, you should consider writing finer grained tests that inspect quantiative behavior of the the class.
Once you're relatively comfortable that GuitarString should be working, try compiling and running 'GuitarHeroLite'. It will provide an interface, allowing the user to interactively play sounds using the synthesizer package's GuitarString class.
When you run GuitarHeroLite, it will open a Standard Draw window. Click on the window, and press "a" or "c". These should play two different guitar string sounds for you. This is just the sound of a double dequeuing repeatedly. It is like magic.
Some More for the So-Inclined
Write a program GuitarHero that is similar to GuitarHeroLite, but supports a total of 37 notes on the chromatic scale from 110Hz to 880Hz. Use the following 37 keys to represent the keyboard, from lowest note to highest note:
String keyboard = "q2we4r5ty7u8i9op-[=zxdcfvgbnjmk,.;/' ";This keyboard arrangement imitates a piano keyboard: The "white keys" are on the qwerty and zxcv rows and the "black keys" on the 12345 and asdf rows of the keyboard.
The ith character of the string keyboard corresponds to a frequency of 440 × 2^(i - 24) / 12, so that the character 'q' is 110Hz, 'i' is 220Hz, 'v' is 440Hz, and ' ' is 880Hz. Don't even think of including 37 individual GuitarString variables or a 37-way if statement! Instead, create an array of 37 GuitarString objects and use keyboard.indexOf(key) to figure out which key was typed. Make sure your program does not crash if a key is pressed that does not correspond to one of your 37 notes.
Even More
- Harp strings: Flipping the sign of the new value before enqueueing it in tic() will change the sound from guitar-like to harp-like. You may want to play with the decay factors to improve the realism, and adjust the buffer sizes by a factor of two since the natural resonance frequency is cut in half by the tic() change.
- Drums: Flipping the sign of a new value with probability 0.5 before enqueueing it in tic() will produce a drum sound. A decay factor of 1.0 (no decay) will yield a better sound, and you will need to adjust the set of frequencies used.
- Guitars play each note on one of 6 physical strings. To simulate this you can divide your GuitarString instances into 6 groups, and when a string is plucked, zero out all other strings in that group.
- Pianos come with a damper pedal which can be used to make the strings stationary. You can implement this by, on iterations where a certain key (such as Shift) is held down, changing the decay factor.
- While we have used equal temperament, the ear finds it more pleasing when musical intervals follow the small fractions in the just intonation system. For example, when a musician uses a brass instrument to play a perfect fifth harmonically, the ratio of frequencies is 3/2 = 1.5 rather than 27/12 ∼ 1.498. Write a program where each successive pair of notes has just intonation.
Why it works
The two primary components that make the Karplus-Strong algorithm work are the ring buffer feedback mechanism and the averaging operation.
- The ring buffer feedback mechanism. The ring buffer models the medium (a string tied down at both ends) in which the energy travels back and forth. The length of the ring buffer determines the fundamental frequency of the resulting sound. Sonically, the feedback mechanism reinforces only the fundamental frequency and its harmonics (frequencies at integer multiples of the fundamental). The energy decay factor (.996 in this case) models the slight dissipation in energy as the wave makes a round trip through the string.
- The averaging operation. The averaging operation serves as a gentle low-pass filter (which removes higher frequencies while allowing lower frequencies to pass, hence the name). Because it is in the path of the feedback, this has the effect of gradually attenuating the higher harmonics while keeping the lower ones, which corresponds closely with how a plucked guitar string sounds.
Exceptions
The original plan was to cover Exceptions in lecture on Monday, but it felt a bit forced. Consequently, you'll instead be introduced to them on this HW (or on pages HFJ) and we'll cover the nitty gritty on Wednesday. To throw an exception, one simply does the following:
throw new RuntimeException("Some kind of message")For example, suppose we want to write a method that takes an integer argument, and prints it as long as it is positive, but throws an exception otherwise. This method would be defined as follows:
public static void printPositiveNumber(int x) {
    if (x <= 0) {
        throw new RuntimeException("Number should be positive.");
    }
    System.out.println(x);
}
An example of code using exceptions can be found in the demo folder (you'll need to git pull skeleton master).
Credits: RingBuffer figures from wikipedia. This assignment adapted from Kevin Wayne's Guitar Heroine assignment.