1. Background
We all love the classic game of Checkers. In this project, we add a twist by introducing two new pieces: Bomb Pieces and Shield Pieces. For details on how these pieces differ, see Rules of Checkers61b. Starting from scratch, you will implement your own GUI-supported version of this game. You should use the provided StdDraw library to implement the GUI.
2. Rules of Checkers61b
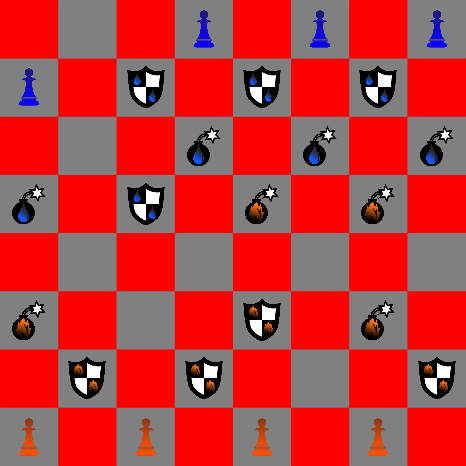
Both players start with the same setup as checkers, as shown in this image:

The board is an 8x8 board, with water and fire pieces on the top and bottom. Each player starts with pieces in the three rows closest to them. The front, middle-most row consists of Bomb Pieces, the second row consists of Shield Pieces, and the back, edge-most row consists of normal pieces. Only every other space on the Board is used, and all pieces can only move and capture diagonally. If a capture move is available, the player is not required to capture. The bottom left corner should have a "black" square, and should contain a normal fire piece.
Movement of pieces are the same as classic Checkers. In all new games, fire team makes the first move. Besides king pieces, fire pieces always move upwards (like flames) and water pieces always move diagonally downwards (like rain). Upon reaching the topmost row, fire pieces become "kinged" and are allowed to move not only diagonally forwards, but also diagonally backwards. The same can be said for water pieces that reach the bottommost row. Capturing a piece works exactly the same as in classic Checkers. You may perform multi-captures like in classic Checkers.
Normal Piece
Moves diagonally, and captures diagonally. Normal pieces can multi-capture, meaning if performing a capture lands the piece in a position ready to perform another capture, that piece may choose to do perform another capture in the same turn.
Shield Piece
A normal checkers piece, except that it cannot be killed by bomb explosions. However, they can still be normally captured by any piece (including bombs).
Bomb Piece
A normal Checkers piece with a twist. Performing a capture with a bomb piece causes an explosion in the destination landing. Explosions kill all pieces adjacent to the landing (all non-shield pieces within a 3x3 block centered at the bomb's final position), as well as the exploding bomb. If a fire bomb explodes, it will kill all fire and water non-shield pieces in range. Chain reaction explosions do not occur. If one bomb destroys another bomb via explosion, a second explosion does not occur. Bomb pieces cannot perform multi-captures, because they explode after the first capture. See the below images for an example of an explosion:
Explosion Example
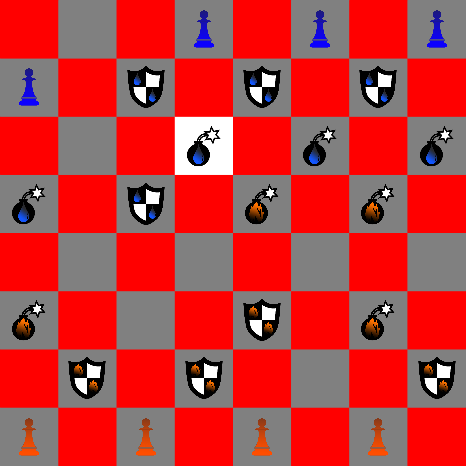
The three images below is an example of an explosion example. Suppose that the blue player is Anusha, and the red player is Leo. In the first image, Anusha ponders her move. In the second image, Anusha has selected the blue piece (highlighted). She’s about to perform a capture. In the third image, Anusha’s water bomb piece has captured a fire bomb and caused an explosion that effectively killed two additional fire bombs. Notice that Leo’s fire shield has survived the explosion. It is now Leo’s turn (after spacebar is pressed).

King Piece
Any piece can become "Kinged" upon reaching the furthest row. King pieces can move and capture in four directions instead of only two. For testing purposes, it is advised to place pieces on the penultimate row and crown them via a game move (as opposed to placing them on the final row directly). A piece may capture, promote to a king, and capture again in the same turn if the orientation of the Board permits.
3. The GUI
This spec will begin by explaining how the system should work as a whole. When it comes to implementation, you should consult the recommended order (below). While this section makes for nice narration, it's not the order in which you should work.
You will be provided a StdDrawPlus.java, with all the methods you’ll need for creating a functional GUI. Do not modify any methods in StdDrawPlus.java. In your Board class, the main method starts a new game of Checkers61b in GUI mode and doesn’t return until the game is over. For optimal visual appeal, we recommend having red/gray (instead of red/black) squares, though you're welcome to use whatever colors you'd like. The GUI coordinate system should work as follows: A piece on (0,0) lies on the bottom left corner. A piece on (7, 7) lies on the top right corner. A piece on (0,7) lies on the top left corner. A piece on (7,0) lies on the bottom right corner.
When a user clicks on a square:
- You should first extract the coordinates of the piece.
- Then check if you can select a piece. (See canSelect in API.)
- If you are allowed to select the piece you clicked on, call select on its coordinates.
When a user presses spacebar:
- You should check if the current player is allowed to end their turn. (See endTurn in API)
- If so, you should make any changes necessary in ending the turn (i.e. switching players).
Here are some methods you will find useful for creating your GUI. These methods should be preceded by "StdDrawPlus." if you wish to call them in another class.
boolean mousePressed(): Returns whether or not the mouse is pressed. A quick way to handle clicks is to set the time poll rate in StdDrawPlus.show to be reasonably quick (10-25 ms is a good ballpark).double mouseX(), mouseY(): Returns the current xy coordinate of the mouse. If you click on a Piece at (x, y), you can get x and y by type-casting to an int.isSpacePressed(): Returns whether spacebar is currently being pressed.show(int time): Displays the current GUI fortimeseconds before continuing the program.setPenColor(StdDrawPlus.Color color): Changes the color of the pen.filledSquare(int x, int y, int r): x, y are the center, r is the half-length of a side. Uses pen’s current color.picture(int x, int y, String imgPath, int w, int h): places a picture located at imgPath centered at x, y are the center. An example of imgPath is "img/bomb-fire-crowned.png". You'll probably want to set w and h to 1 to fit one of the 64 squares. Generally, centering something on square (2,3) will require x to be 2.5 and y to be 3.5 (and so forth).
The GUI will not be tested by the release ag tests. It may (or may not) be tested by the secret tests.
4. Required Methods / API
In addition the methods described below, you are strongly encouraged to create additional variables and helper methods as necessary. You are not allowed to create additional public methods. The Autograder will be very upset with you. You may only add new private methods and private variables.
Board.java
main (String args[])- starts a GUI supported version of the game.Board(boolean shouldBeEmpty)- The constructor for Board. IfshouldBeEmptyis true, initializes an empty Board. Otherwise, initializes a Board with the default configuration. Note that an empty Board could possibly be useful for testing purposes.Piece pieceAt(int x, int y)- Gets the piece at position (x, y) on the board, or null if there is no piece. If (x, y) are out of bounds, returns null.boolean canSelect(int x, int y)- Returns true if the square at (x, y) can be selected.A square with a piece may be selected if it is the corresponding player’s turn and one of the following is true:
- The player has not selected a piece yet.
- The player has selected a piece, but did not move it.
An empty square may be selected if one of the following is true:
- During this turn, the player has selected a Piece which hasn’t moved yet and is selecting an empty spot which is a valid move for the previously selected Piece.
- During this turn, the player has selected a Piece, captured, and has selected another valid capture destination. When performing multi-captures, you should only select the active piece once; all other selections should be valid destination points.
boolean validMove(int xi, int yi, int xf, int yf)- Returns true if the piece at (xi, yi) can either move to (xf, yf) or capture to (xf, yf), strictly from a geometry/piece-race point of view.validMovedoes not need to take into consideration whose turn it is or if a move has already been made, but rather can.validMoveis not required, and will not be tested. You may implement this however you want. It is suggested you use this method to simplify your implementation ofcanSelect. However, this method must be private.void select(int x, int y)- Selects the square at (x, y). This method assumes canSelect (x,y) returns true. Optionally, it is recommended to color the background of the selected square white on the GUI via the pen color function. For any piece to perform a capture, that piece must have been selected first. If you select a square with a piece, you are prepping that piece for movement. If you select an empty square (assuming canSelect returns true), you should move your most recently selected piece to that square.void place(Piece p, int x, int y)- Places p at (x, y). If (x, y) is out of bounds or if p is null, does nothing. If another piece already exists at (x, y), p will replace that piece. (This method is potentially useful for creating specific test circumstances.)Piece remove(int x, int y)- Executes a remove. Returns the piece that was removed. If the input (x, y) is out of bounds, returns null and prints an appropriate message. If there is no piece at (x, y), returns null and prints an appropriate message.boolean canEndTurn()- Returns whether or not the the current player can end their turn. To be able to end a turn, a piece must have moved or performed a capture.void endTurn()- Called at the end of each turn. Handles switching of players and anything else that should happen at the end of a turn.String winner()- Returns the winner of the game: "Fire", "Water", "No one", or null. If only fire pieces remain on the board, fire wins. If only water pieces remain, water wins. If no pieces remain (consider an explosion capture), no one wins. If the game is still in progress (ie there are pieces from both sides still on the board) return null. Assume there is no stalemate situation in which the current player has pieces but cannot legally move any of them (In this event, just leave it at null). Determine the winner solely by the number of pieces belonging to each team.
Piece.java
Piece(boolean isFire, Board b, int x, int y, String type)- Constructor for a piece. isFire determines whether the piece is a fire or water piece. b represents the Board that the piece is on (this will be only be used for the move() method). (x, y) is the position to initialize it at. type is a string representing the type of the Piece. It should be either "pawn", "bomb", or "shield". (Don’t worry about bounds checking). The new piece should not be a king.boolean isFire()- Returns whether or not the piece is a fire piece.int side()- Returns 0 if the piece is a fire piece, or 1 if the piece is a water piece. This might seem redundant with isFire(), and there are better ways, but for this 0th project, we'll just provide these both as tools that you might want to use later.boolean isKing()- Returns whether or not the piece has been crowned.boolean isBomb()- Returns whether or not the piece is a Bomb Piece.boolean isShield()- Returns whether or not the piece is a Shield Piece.void move(int x, int y)- Assumes this Piece's movement from its current position to (x, y) is valid. Moves the piece to (x, y), capturing any intermediate piece if applicable. This will be a difficult method to write.boolean hasCaptured()- Returns whether or not this Piece has captured another piece this turn.void doneCapturing()- Called at the end of each turn on the Piece that moved. Makes sure the piece's hasCaptured() value returns to false.
5. Advice
Start early! Don't underestimate the project. Playing checkers is easy. Making it is harder than it seems. We will provide a staff version of the game for you to understand how your program should behave. Make your method calls consistent. Calling canSelect on the same piece multiple times in a row should return the same answer. Advice steps after #4 are likely to undergo modification.
Running the Given Staff Solution
We have provided a staff solution for you to get a feel for the rules. In order to run this, you should first ensure that your skeleton repo is up-to-date and on your CLASSPATH, as taught in lab 1c. (You may update your skeleton by calling git pull origin master from within the folder. You want to make sure you have a skeleton/lib/staffp0_obf.jar file). You should also ensure that you are in a directory that is parallel with an img/ directory (if you ls, you can see img/) so that the program can use the images of the pieces. This may be either from skeleton, or even better, inside your own aaa/proj0/ folder. From a correct directory, run the staff solution by using:
java staffp0.StaffBoard
If you get a "Could not find or load...", your CLASSPATH is probably set up incorrectly. You should fix that. Inappropriately, a temporary workaround is to manually include the staffp0_obf.jar in your class path. Assuming both img/ and staffp0_obf.jar are visible in an ls command, run:
java -cp staffp0_obf.jar staffp0.StaffBoard
Recommended order of tasks / Checkpoints:
Remember to look at the GUI tips if you find yourself stuck.
- Read the spec and understand the overall picture. Try out the example solution.
- Write JUnit tests for the Piece class for all methods except the move() method. Create the Piece class and implement its methods, starting from the simple and working your way to the more complicated. Do not add new public methods. Don't implement move() yet.
- Create Board.java so that when you type
java Board, it displays a blank 8x8 board. (You will be implementing parts of your board as you go along). SeeStdDrawDemo.javafor inspiration. You do not need to cite this assistance in your source files. - Modify Board so that it starts up with the correct initial configuration of the board (first image in this spec). We do not recommend JUnit tests for this task, since it is likely to be easier for you to visually verify the correctness compared to writing a test. You should only do testing when you think it will save you time.
- Work through the Board methods.
pieceAtandplaceare probably a good place (ha ha) to start. For the more complicated methods, it is highly recommended that you test these using JUnit instead of using your GUI and clicking around like mad to test. This will make you become insane. Don't forget about the false option in the Board constructor. It may be particularly handy for testing. - Handle canSelect and select. (First check if it's the right player's turn, then check other conditions.)
- Implement canEndTurn and endTurn methods.
- Handle piece movement, regular piece capturing, and finally bomb piece capturing.
- Polish up your JUnit tests to make sure you've handled edge cases.
Bonus for Bosses
- [HIGHLY RECOMMENDED] Implement highlight square on the GUI. Make the selected square white for niceness. This will help you test methods such as
canSelectandselectas you use the GUI. - Start a new game by pressing "n" in GUI mode. (Use the StdDrawPlus.isNPressed() method).
- Implement an undo method, reverting the board to the previous state.
- Make some cool animations and sounds to accompany bomb explosions on the gui. StdDrawPlus currently doesn't support animations/sounds, so you should Google for another library that can help you out.
- Handle the stalemate situation. Have the game terminate however you like when the current player has pieces, but cannot move any of them.
6. Submission
Project 0 is due Friday, February 13th at 11:59:59pm. Submit to your three letter repo on GitHub. Make sure to push your final submission to a submit/proj0 branch. (It's recommended you finish all of your testing and revisions before submitting to the submit branch.)