Navigation
- A. Overview of Gitlet
- D. Miscellaneous Things to Know about the Project
- E. Submission and Grading
- G. Acknowledgements
A. Overview of Gitlet
In this project you'll be implementing a version control system. This version control system mimics some of the basic features of the popular version control system git, but it is smaller and simpler, so we have named it gitlet.
A version control system helps you save snapshots of your files at different points in time. That way, if you mess them up later, you can return to earlier versions. In gitlet, a snapshot of files is referred to as a commit.
In this project, it will be helpful for us to visualize the commits we make over time. Suppose we have a file wug.txt, we add some text to it, and commit it. Then we modify the file and commit these changes. Then we modify the file again, and commit the changes again. Now we have saved three total snapshots of this file, each one further in time than the previous. We can visualize these commits like so:
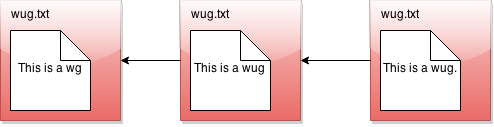
Here we've drawn an arrow indicating that each commit contains some kind of reference to the commit that came before it — this will be important later. But for now, does this drawing look familiar? That's right; it's a linked list!
The big idea behind gitlet is that once we have this list of commits, it's very easy for us to restore old versions of files. You can imagine making a command like: "Gitlet, please revert to the state of the files at commit #2", and it would go to the second node in the linked list and restore the copies of files found there.
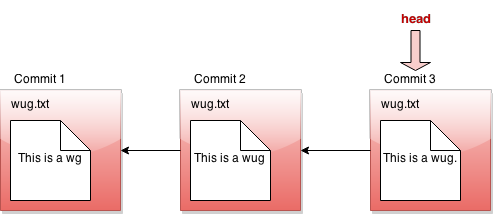
If we tell gitlet to revert to an old commit, the front of the linked list will no longer reflect the current state of your files, which might be a little misleading. In order to fix this problem, we introduce something called a head pointer. A head pointer keeps track of where in the linked list we're currently "at". Normally, as we make commits, the head pointer will stay at the front of the linked list, indicating that the latest commit reflects the current state of the files:
However, let's say we revert to the state of the files at commit #2. We move the head pointer back to show this:
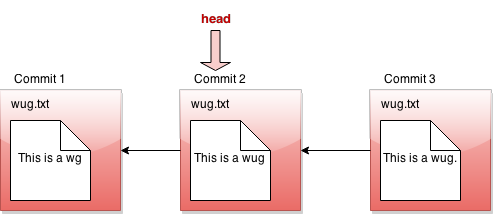
So what happens if we change wug.txt here, and make a new commit?
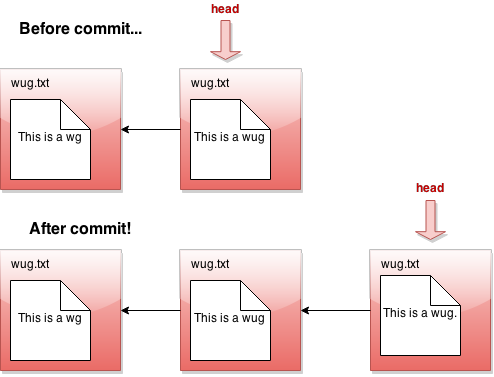
First, let's refine our idea of what a commit is. Recall that the head pointer is supposed to indicate something like the current state of the files, and a commit is a snapshot of the current state of our files. What we now say is this: when we commit, we'll add a new node to the front of the head pointer. Then, we'll move head pointer to the new commit. So if we do another commit now...
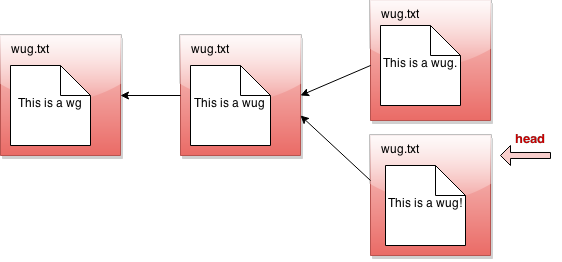
Something weird happened! Normally, when we repeatedly make commits in a row, we just keep appending to the front of head, so we end up with a list. But notice that if we revert backward and then commit from the middle, the thing branches! We no longer have a list of commits, but a tree of commits.
What happened is that now we don't just have old and new versions of our file. We have alternate versions of it. Maybe we did this because we're not sure which version of the file is better, so we want to keep both around temporarily.
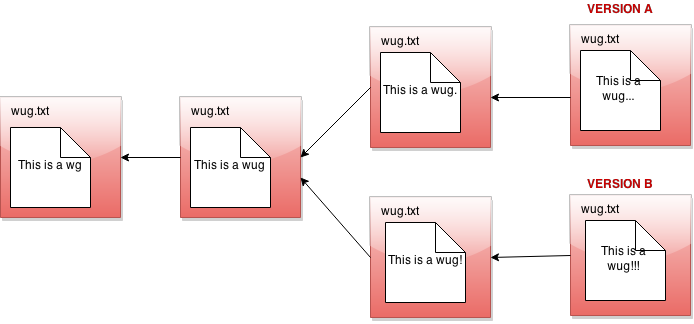
Since we're not sure which version of the file we like better, we think it might be helpful to switch between them whenever we want. To make this easier, we might want to label them. We can imagine making a command like: "Gitlet, please label one of these versions A, and the other B!"
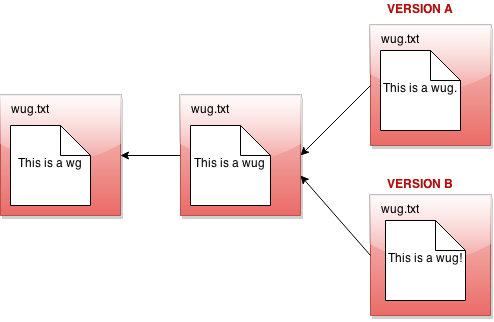
So there is a version A and a version B going here. Now you can tell Gitlet to switch back and forth between them at will, and make commits on each one separately, developing each independently.
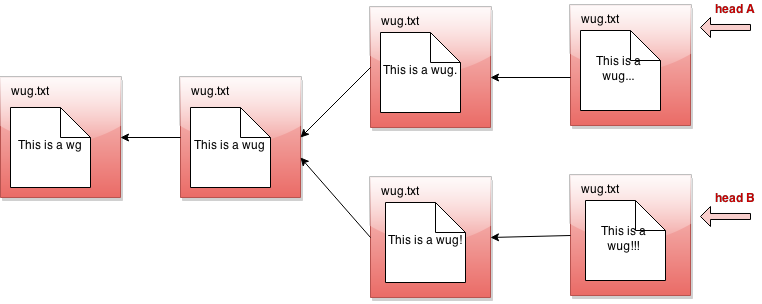
In gitlet, these different versions are formally referred to as branches. The idea is that each branch has its own head node, which is the node at the front of the branch.
In this project, you'll write commands for committing, branching, and grabbing files from all around the commit tree. A detailed spec of how this should work follows this section.
But a last word here: one feature of the commit tree that it is in some sense immutable: once a commit node has been created, it can never be destroyed (or changed at all). We can only add new things to the commit tree, not modify existing things. This is an important feature of gitlet! Remember, it's a version control system, and one of our goals with it is to allow us to save things so we don't delete them accidentally.
B. Detailed Spec of Behavior
Overall Spec
The only structure requirement we’re giving you is that you have a class named Gitlet and that it has a main method. Here’s your skeleton code for this project:
public class Gitlet {
    public static void main(String[] args) {
    }
}
You may, of course, write additional java classes to support your project. But don’t use any external code (aside from JUnit), and don’t use any programming language other than Java. You can use all of the Java Standard Library that you wish.
The majority of this spec will describe how Gitlet.java's main method must react when it receives various arguments which correspond to commands to the gitlet system. But before we break down command-by-command, here are some overall guidelines the whole project should satisfy:
- In order for gitlet to work, it will will need to store old copies of files, and other metadata. All of this stuff must be stored in a folder called
.gitlet(Note: files with a.in front are hidden files. You will not be able to see them by default). A gitlet system is considered "initialized" in a particular location if it has a.gitletfolder there. Most gitlet commands (except for the initilization command) only need to work when used from a directory where a gitlet system has been initialized — i.e. a directory that has a.gitletfolder. Note: the files that aren't in your.gitletfolder (i.e. the current versions of the files, not the backups), are referred to as the files in your working directory. Some commands are classifed as "dangerous". Dangerous commands are ones that potentially overwrite files (that aren’t just metadata) — for example, if a user tells Gitlet to restore files to older versions, it may overwrite the current versions of the files. If a user inputs a dangerous command, gitlet must first prompt them with the following message:
Warning: The command you entered may alter the files in your working directory. Uncommitted changes may be lost. Are you sure you want to continue? (yes/no)
Allow the user to input an answer, and only follow through with the command if the user types yes.
- No gitlet commands should ever delete files. They may only overwrite files, and then only with the warning given above.
- Most commands have runtimes or memory usage requirements. You must follow these. Some of the runtimes are described as constant "relative to any significant measure". The significant measures are any measure of number or size of files, any measure of number of commits. You can ignore time required to serialize or deserialize, with the one caveat that your serialization time cannot depend in any way on the total size of files that have been added, committed, etc.
- Some commands have failure cases with a specified error message. The exact formats of these are specified later in the spec. If your program ever encounters one of these failure cases, it should print the error message and not do anything else.
- Essentially all commands may fail due to general io problems (such as running out of memory on your computer and being unable to make copies of files, or locking files accidentally...) For the sake of brevity, this spec does not list these kinds of errors as possible "failure cases"; it only discusses errors specific to this project. For your own sake, be aware that these errors can occur, but don't worry about handling them in your project.
- In addition, many commands may fail if the stored backup copies of files are manually deleted by the user. For example, you may try to restore an old version of a file that doesn't exist because a user went into the
.gitletfolder and deleted the backup. If this happens, continue with the command, just ignoring the missing file and not overwriting the current file to be deleted. Since this error can apply to a number of commands, the spec doesn't mention it as a failure case for each one, but please be aware of it nontheless. - Some of the commands have their differences from the real git listed. The spec is not exhaustive in listing all differences from git, but it does list some of the bigger or potentially confusing and misleading ones.
- Do NOT print out anything except for what the spec says. Some of our secret autograder tests will break if you print anything more than necessary.
C. The Commands
initialize
- Usage:
java Gitlet init - Description: Creates a new gitlet version control system in the current directory. This system will automatically start with one commit: a commit that contains no files and has the commit message
initial commit. - Runtime: Should be constant relative to any significant measure.
- Failure cases: If there is already a gitlet version control system in the current directory, it should abort. It should NOT overwrite the existing system with a new one. Should print the error message
A gitlet version control system already exists in the current directory. - Dangerous?: No
add
- Usage:
java Gitlet add [file name] - Description: Indicates you want the file to be included in the upcoming commit as having been changed. Adding a file is also called staging the file. If the file had been marked for removal, instead just unmark it.
- Runtime: In the worst case, should run in linear time relative to the size of the file being added.
- Failure cases: If the file does not exist, print the error message
File does not exist.If the file has not been modified since the last commit, aborts and prints the error messageFile has not been modified since the last commit. - Dangerous?: No
- Differences from real git: In Gitlet, if a file is added, then modified, then committed, the contents of the file at the time of the commit command are recorded (not the contents at the time of add). By contrast, in Git, if a file is added, then modified, then committed, the contents of the file at the time of the add command are recorded (not the contents at the time of commit). In short, real Git creates snapshots for every add, whereas in Gitlet, this does not occur.
commit
- Usage:
java Gitlet commit [message] Description: Saves a snapshot of certain files that can be viewed or restored at a later time. The files in a commit's snapshot come from two sources: files that were newly added to this commit (staged prior to the commit), and files that were inherited from the previous commit. We'll refer to these two groups of files as "the commit's added files" and "the commit's old files" respectively. In general, a new commit inherits all of the files in the previous commit as its old files (both the previous commit's added and old files). However, don't inherit files that were added to the new commit, becuase the added file takes precedent over the old one. Remember that adding a file indicates you want to save a new version of the file, so if you added the file it means that you don't need the old version anymore.
Some additional points about this commit:
- The commit is added as a new node in the commit tree.
- This command moves the head pointer to point to the new node.
- Each commit should have a unique integer id number.
- Each commit should remember what time it was made.
- Each commit has a message associated with it that describes the changes to the files in the commit. This is specified by the user. Note: The entire message should take up only one entry in the array
argsthat is passed tomain. To include multiword messages, you'll have to surround them in quotes.
- Runtime: Runtime should be constant with respect to any measure of number of commits. Runtime must be no worse than linear with respect to the total size of files in the commit’s snapshot, and linear with respect to the number of files in the previous commit. Additionally, this command has a memory requirement: Committing must increase the size of the
.gitletfolder by no more than the total size of the commit's added files, not including additional metadata (i.e., this means don’t store redundant copies of the commit's old files, since you had already stored them when they were added to some older commit). One more note: You are allowed to save whole additional copies of files; don't worry about only saving diffs, or anything like that. - Failure cases: If no files have been staged (or marked for removal: more on that next), aborts. Print the error message
No changes added to the commit.Also, the commit must have a non-blank message. If it doesn't, print the error messagePlease enter a commit message. - Dangerous?: No
- Differences from real git: In real git, commits are not associated with any old id number, but a special kind of hash code. Using a hash is actually more powerful than using an arbitrary id number; can you think of why? Also, snapshots in real git are taken when files are added, not committed.
Here's a picture of before-and-after commit:
remove
- Usage:
java Gitlet rm [file name] - Description: Mark the file for removal; this means it will not be inherited as an old file in the next commit. If the file had been staged, instead unstage it.
- Runtime: Should run in constant time relative to any significant measure.
- Failure cases: If the file is neither added nor included in the previous commit, print the error message
No reason to remove the file. - Dangerous?: No
- Differences from real git: Be aware the the real git
rmcommand works differently; it will actually delete the file! This command is more similar togit rm --cached [file name].
log
- Usage:
java Gitlet log Description: Starting at the current head pointer, display information about each commit backwards along the commit tree until the initial commit. This set of commit nodes is called the commit’s history. For every node in this history, the information it should display is the commit id, the time the commit was made, and the commit message. Here is an example of the exact format it should follow:
====
Commit 2.
2015-03-14 11:59:26
A commit message.

====
Commit 1.
2015-03-14 11:49:29
Another commit message.

====
Commit 0.
2015-03-14 11:39:26
initial commit
Notice there is a ==== separating each commit. There is also an empty line between each commit. Also notice that commits are displayed with the most recent at the top. By the way, there's a class in the Java standard library that will help you format the dates really easily. Look into that instead of trying to construct it manually yourself!
- Runtime: Should be linear with respect to the number of nodes in head’s history.
- Failure cases: None
- Dangerous?: No
Here's a picture of the history of a particular commit. If the current branch's head pointer happened to be pointing to that commit, log would print out information about the circled commits:
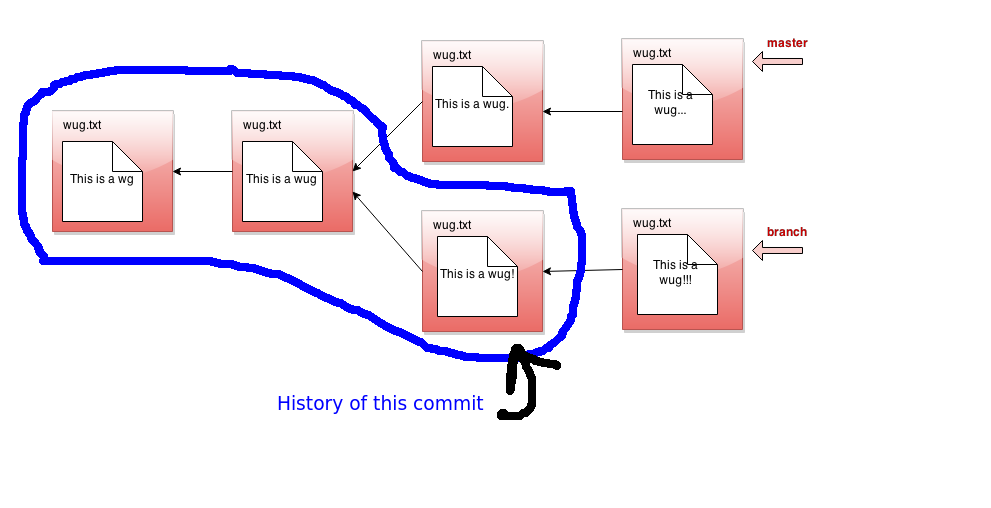
Note that it ignores other branches and the future. Now that we have the concept of history, let's refine what we said earlier about the commit tree being immutable. It is immutable precisely in the sense that the history of a commit with a particular id may never change, ever. If you think of the commit tree as nothing more than a collection of histories, then what we're really saying is that each history is immutable.
global log
- Usage:
java Gitlet global-log - Description: Like log, except displays information about all commits ever made. The order of the commits does not matter.
- Runtime: Linear with respect to the number of commits ever made.
- Failure cases: None
- Dangerous?: No
find
- Usage:
java Gitlet find [commit message] - Description: Prints out the id of the commit that has the given commit message. If there are multiple such commits, it prints the ids out on separate lines.
- Runtime: Should be linear relative to the number of commits that have the given message.
- Failure cases: If no such commit exists, prints the error message
Found no commit with that message. - Dangerous?: No
- Differences from real git: Doesn't exist in real git. Similar effects can be achieved by grepping the output of log.
status
- Usage:
java Gitlet status Description: Displays what branches currently exist, and marks the current branch with a
*. Also displays what files have been staged or marked for removal. An example of the exact format it should follow is as follows.=== Branches === *master other-branch === Staged Files === wug.txt some_folder/wugs.txt === Files Marked for Removal === goodbye.txt
Notice there is an empty line between each section. The order of branches/files within each section does not matter.
- Runtime: Make sure this is linear relative to the number of files that have been staged or marked for removal and the number of branches that exist.
- Failure cases: None
- Dangerous?: No
checkout
Checkout is a kind of general command that can do a few different things depending on what its arguments are. There are 3 possible use cases. In each section below, you'll see 3 bullet points. Each corresponds to the respective usage of checkout.
Usages:
java Gitlet checkout [file name]java Gitlet checkout [commit id] [file name]java Gitlet checkout [branch name]
Descriptions:
- Restores the given file in the working directory to its state at the commit at the head of the current branch.
- Restores the given file in the working directory to its state at the given commit.
- Restores all files in the working directory to their versions in the commit at the head of the given branch. Considers the given branch to now be the current branch.
Runtimes:
- Should be linear relative to the size of the file being checked out.
- Should be linear relative to the size of the file being checked out.
- Should be linear with respect to the total size of the files in the commit's snapshot. Should be constant with respect to any measure involving number of commits. Should be constant with respect to the number of branches.
Failure cases:
- If the file does not exist in the previous commit, aborts, printing the error message
File does not exist in the most recent commit, or no such branch exists. - If no commit with the given id exists, print
No commit with that id exists.Else, if the file does not exist in the given commit, printFile does not exist in that commit. - If no branch with that name exists, print
File does not exist in the most recent commit, or no such branch exists.If that branch is the current branch, printNo need to checkout the current branch.
- If the file does not exist in the previous commit, aborts, printing the error message
In addition, you might wonder: what happens if you have a file name that's the same as a branch name? In this case, let the branch name take precedence.
- Dangerous?: Yes!
branch
- Usage:
java Gitlet branch [branch name] - Description: Creates a new branch with the given name. A branch is nothing more than the name of a head pointer in the commit graph. Before you ever call branch, your code should be running with a default branch called "master". Note: Does NOT immediately switch to the newly created branch.
- Runtime: Should be constant relative to any significant measure.
- Failure cases: If a branch with the given name already exists, print the error message
A branch with that name already exists. - Dangerous?: No
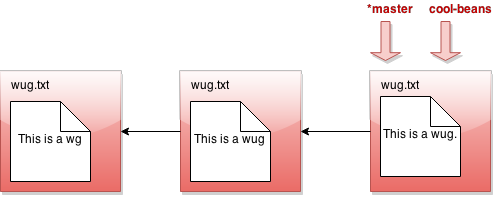
All right, let's see what branch does in detail. Suppose our state looks like this:

Now we call java Gitlet branch cool-beans. Then we get this:
Hmm... nothing much happened. Let's switch to the branch with java Gitlet checkout cool-beans:
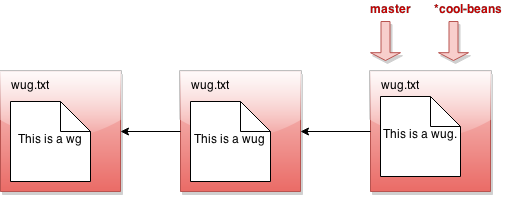
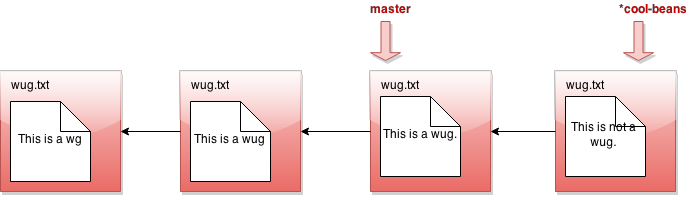
Nothing much happened again?! Okay, say we make a commit now. Modify some files, then java Gitlet add... then java Gitlet commit....
I was told there would be branching. But all I see is a straight line. What's going on? Maybe I should go back to my other branch with java Gitlet checkout master:

Now I make a commit...
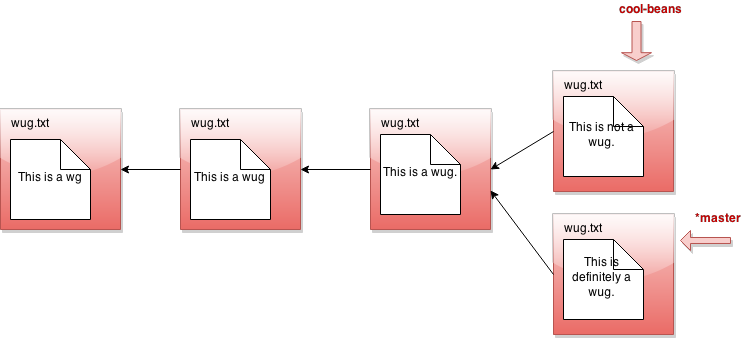
Phew! So that's the whole idea of branching. Did you catch what's going on? All creating a branch does is give us a new head pointer. At any given time, one of these head pointers is considered the currently active head pointer (indicated by *). We can switch the currently active head pointer with checkout. Whenever we commit, it means we add a new commit in front of the currently active head pointer, even if one is already there. This naturally creates branching behavior.
Make sure that the behavior of your branch, checkout, and commit match what I've described above. This is pretty core functionality of gitlet that many other commands will depend upon. If any of this core functionality is broken, very many of our autograder tests won't work!
remove branch
- Usage:
java Gitlet rm-branch [branch name] - Description: Deletes the branch with the given name. This only means to delete the head pointer associated with the branch; it does not mean to delete all commits that were created under the branch, or anything like that.
- Runtime: Should be constant relative to any significant measure.
- Failure cases: If a branch with the given name does not exist, aborts. Print the error message
A branch with that name does not exist.If you try to remove the branch you're currently on, aborts, printing the error messageCannot remove the current branch. - Dangerous?: No
reset
Usages:
java Gitlet reset [commit id]
Descriptions:
- Restores all files to their versions in the commit with the given id. Also moves the current branch's head to that commit node.
Runtimes:
- Should be linear with respect to the total size of files in the given commit’s snapshot. Should be constant with respect to any measure involving number of commits.
Failure cases:
- If no commit with the given id exists, print
No commit with that id exists.
- If no commit with the given id exists, print
- Dangerous?: Yes!
- Differences from real git: Just note that this command is closest to using the
--hardoption, i.e.git reset --hard [commit hash].
merge
- Usage:
java Gitlet merge [branch name] Description: Merges files from the head of the given branch into the head of the current branch. This method is a bit complicated, so here’s a more detailed description:
- First consider what might be called the split point of the current branch and the given branch. This is their earliest common ancestor in the commit tree.
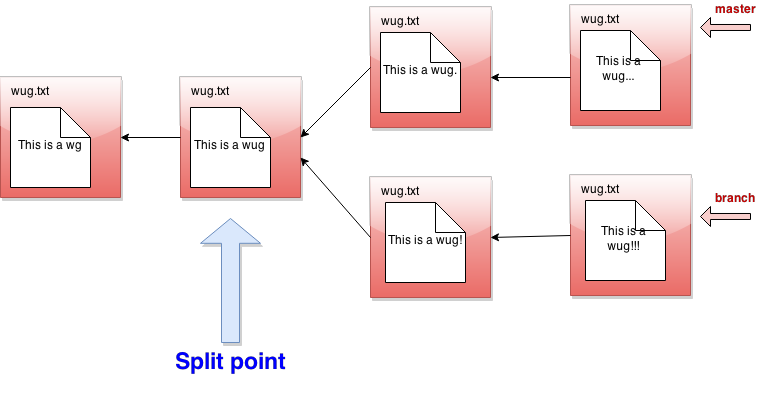
- Any files that have been modified in the given branch (added to any of the commits along the branch, and not subsequently removed) but not in the current branch since the split point should be changed to their versions in the given branch.
- Any files that have been modified in the current branch (added and not subsequently removed) but not in the given branch since the split point should stay as they are.
- For files that have been modified in both branches since the split point (added but not subsequently removed), the files should stay as they are in the current branch. However, in addition, the version of the file from the given branch should be copied into the file system with the name [old file name].conflicted.
- First consider what might be called the split point of the current branch and the given branch. This is their earliest common ancestor in the commit tree.
- Runtime: Should be linear in terms of the lengths of the history of each branch. Should also be linear in terms of the total size of new files added in commits in each branch.
- Failure cases: If a branch with the given name does not exist, print the error message
A branch with that name does not exist.If attempting to merge a branch with itself, print the error messageCannot merge a branch with itself. - Dangerous?: Yes! Also, take note that although this method modifies files, it should NOT modify the commit tree. In order to save changes into the commit tree, they must be added and committed like normal. There is no special case for this commit; it's just a normal commit.
- Differences from real git: There are a few. For one, if the real git doesn't run into any merge conflicts, it will automatically create a new commit for you at the end, but gitlet does not. In git, this new commit at the end of merge is special, because it maintains two back pointers remembering which two branches it came from. But gitlet only maintains one normal back pointer on the current branch.
Furthermore, the real git handles merge conflicts differently than gitlet. The real git will splice the two conflicted files together into a single file, then ask the user to pick and choose the correct sections manually. Gitlet does not do this, instead just adding in the .conflicted copy. Furthermore, git will put you in a special state where the commands you can run are limited until you finish resolving the merge conflict. Gitlet does no such thing.
rebase
- Usage:
java Gitlet rebase [branch name] Description: Conceptually, what rebase does is find the split point of the current branch and the given branch, then snaps off the current branch at this point, then reattaches the current branch to the head of the given branch. Say we are on branch
branchand we make the calljava Gitlet rebase master: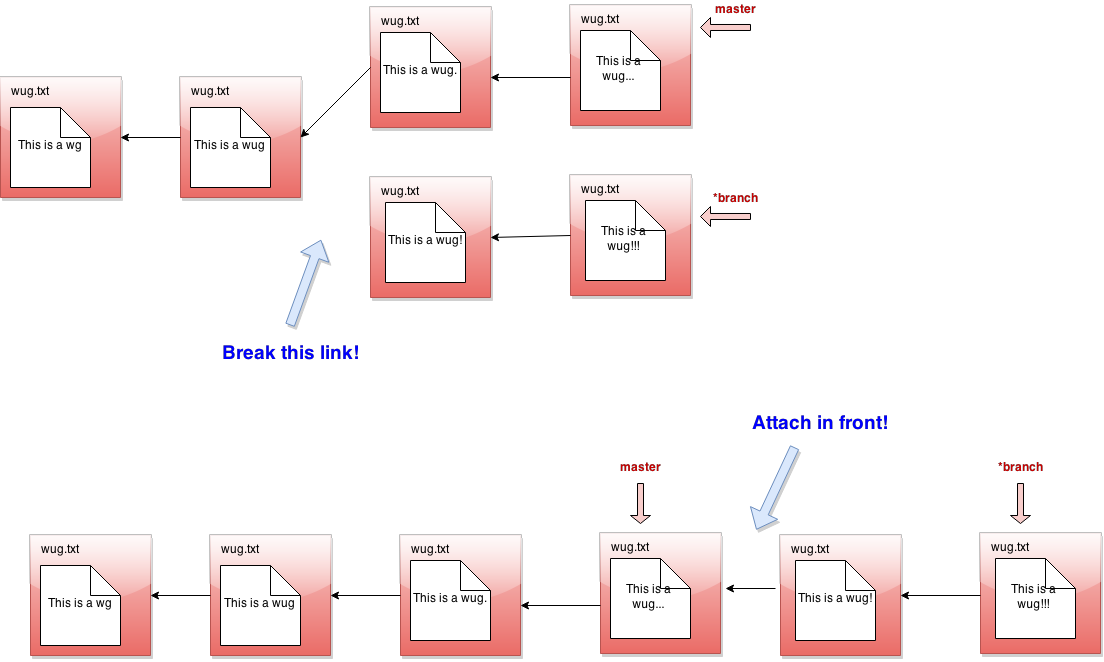 Now, this may prompt two questions:
- Why would you ever want to do this? You can think of it as an alternative to merge, where instead of having two branches that come together, you just pretend as if one of the branches came after the other one. If you use it smartly, this can create a cleaner history than merge.
- Doesn't this ruin what you said about the commit tree being immutable? Yes, it does! That's because I just lied to you in the picture above. In fact, rebase does not break off the current branch. Instead, it leaves the current branch there, but makes a copy of the current branch on top of the given branch (this is called replaying the branch). Then it moves the branch pointer to point to this copy, so that you can pretend you moved it. Here's the real picture:
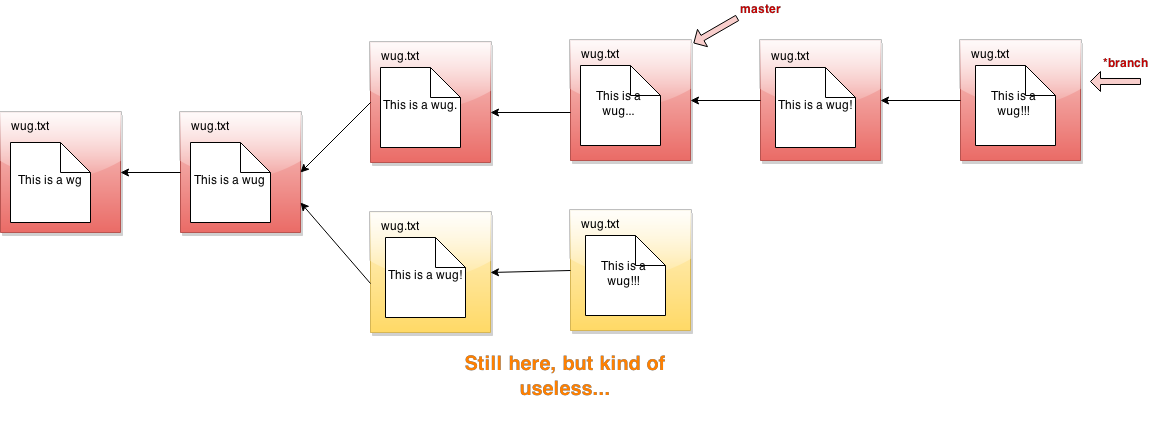 Note: the replayed commits should have new ids, not copies of the original ids. This allows you to still access the original commits using their old ids, if you really wanted to. In addition, the replayed commits should have new time stamps, allowing you to distinguish them from the originals in global-log.
Rebase has one special case to look out for. If the current branch is in the history of the given branch, rebase just moves the current branch to point to the same commit that the given branch points to. No commits are replayed in this case.
There's one more point to make about rebase: If after the split point the given branch contains modifications to files that were not modified in the current branch, then these modifications should propagate through the replayed branch. If both the given branch and the current branch have modifications to the same files, then what you would expect to happen is that you would get conflicted files, much like merge. However, for simplicity, we're not going to have you deal with conflicts: in this case, just use the current branch's copies of the files.
Finally, after any successful rebase command, update the files in the working directory to reflect the versions of the files at the new head of the current branch.
By the way, if there are multiple branches after the split point, you should NOT replay the other branches. For example, say we are on branch branch1 and we make the call java Gitlet rebase master: 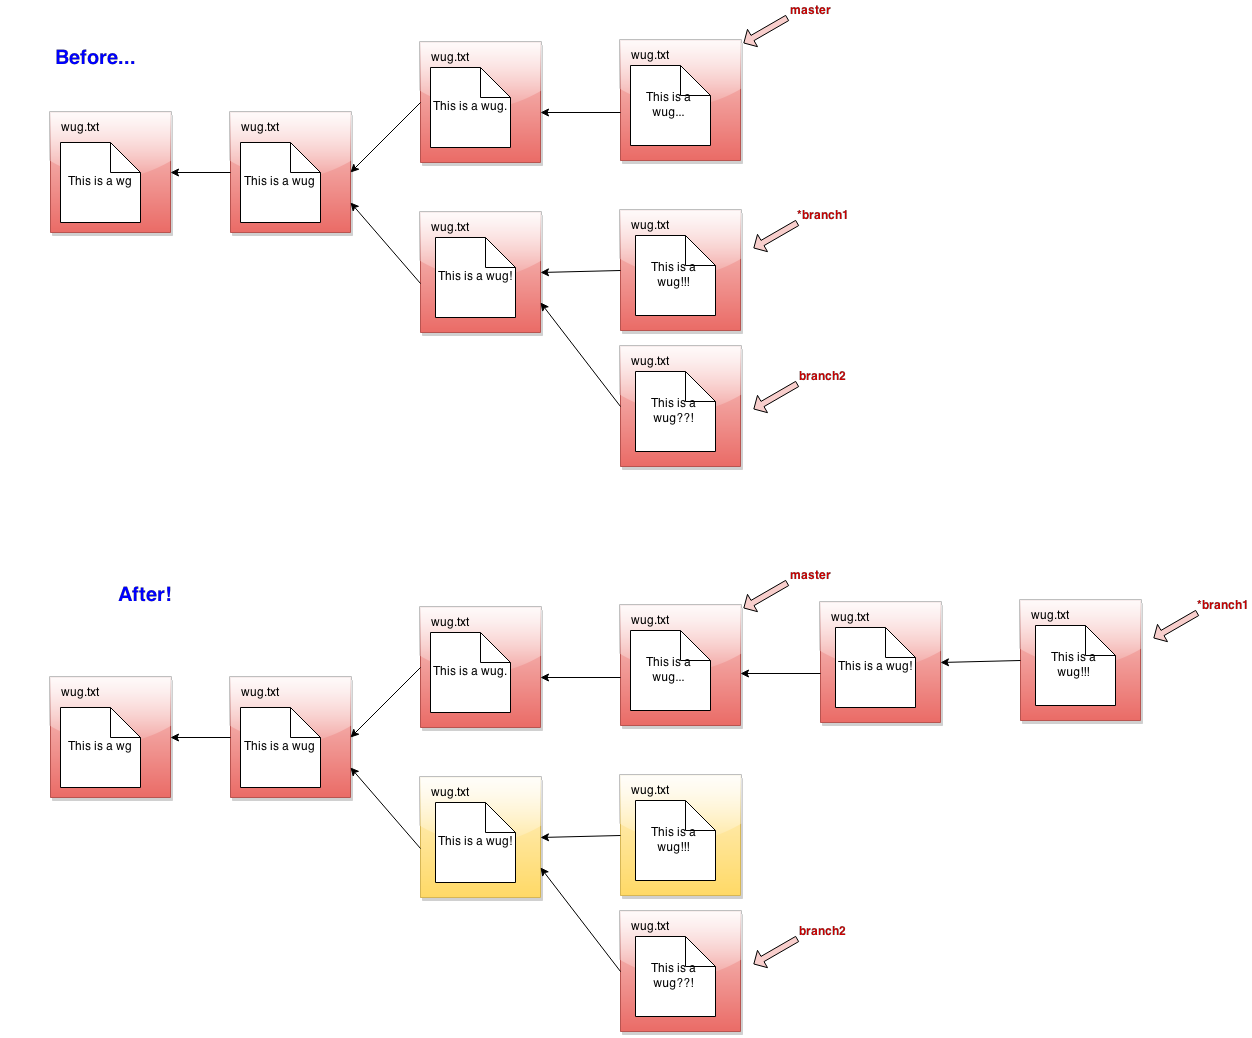
- Runtime: Should be linear relative to the history of the current brach and the given branch. Should also be linear in terms of the number of files added to both branches. Should also be linear relative to the total size of files added to the given branch. Also, be aware that rebase should not need to make any additional backup copies of files.
- Failure cases: If a branch with the given name does not exist, print the error message
A branch with that name does not exist.If the given branch name is the same as the current branch name, print the error messageCannot rebase a branch onto itself.If the input branch's head is in the history of the current branch's head, print the error messageAlready up-to-date. - Dangerous?: Yes.
- Differences from the real git: The real git's rebase is a complicated and many-flagged command. Gitlet's rebase really only gets at the core idea. In particular, note that the way it handles conflicts is much different! For instance, the real rebase will pause when it encounters a conflict, make the user fix it, and then continue on afterward.
interactive rebase
- Usage:
java Gitlet i-rebase [branch name] Description: This does essentially what rebase does, but with one twist. For each node it replays, it allows the user to change the commit’s message or skip replaying the commit. This means the command needs to pause and prompt the user for text input before continuing with each commit. For each commit, the command should print out the following:
Currently replaying:Then it should print out information about the commit like log does (just the one commit, not all of its history). Finally it should prompt the user with the message
Would you like to (c)ontinue, (s)kip this commit, or change this commit's (m)essage?It should act based on whether the user types
c,s, orm. If the user types something different, asks the user for input again.If the user choose to continue, then it replays the commit and continues on to ask about the next one.
If the user chooses to skip, then it does not replay the commit, but continues on to ask about the next one. Note: skipping a commit does not mean you forget its changes. Rather, the changes made in a skipped commit are incorporated into or overwritten by the next unskipped commit. You cannot skip the initial or final commit of a branch. If a user does this, ask them for input again.
If the user chooses to change the commit's message, then prompt them with
Please enter a new message for this commit.and wait for them to enter a message. Include this as the message of the replayed commit.
By the way, if you didn't notice, the point of interactive rebase is that it gives you the power to rewrite history. Interactive rebase essentially allows you to pretend to modify the commit tree, fixing typos in commits or getting rid of useless ones.
- Runtime: Should be no different than rebase along any significant measure.
- Failure cases: Same as rebase.
- Dangerous?: Yes.
- Differences from the real git: This command is inspired by the
-iflag for git's rebase, i.e.git rebase -i [branch name]. Git's interactive rebase is much more fully featured than gitlet's!
D. Miscellaneous Things to Know about the Project
Phew! That was a lot of commands to go over just now. But don't worry, not all commands are created equal. Many are just minor bookkeeping command and will only take about a line of code. Merge and rebase are lengthier commands than the others, so don't leave them for the last minute!
Anyway, by now this spec has given you enough information to get working on the project. But to help you out some more, there are a couple of things you should be aware of:
- This project requires reading and writing of files. In order to do these operations, you’ll probably want to look into the class
java.io.File. Actually, you may find various things in thejava.ioandjava.niopackages helpful. Feel free to explore other stuff in the Java standard library. If you do a little digging through it, you might find a couple of methods that will make the io portion of this project much easier! - If you think about gitlet, you'll notice that you can only run one command every time you run the program. In order to successfully complete your version control system, you'll need to remember the commit tree across commands. This means you'll need to maintain some state that carries across multiple runs of your program. If you sit and think about this, you may realize you haven't ever had to do this so far in the class. It would be helpful if you could save objects created one time you run the program for use the next time you run the program, but so far, objects have always been destroyed when the program finishes.
The strategy we recommend for dealing with this is to write your objects to a file before ending the program. Then, next time you start the program, you first read back in the state of the objects from the file. Luckily, this is very easy to do this in Java. Look into the java.io.Serializable interface!
~~Warning: serializing and deserializing takes time proportional to the number of objects you are serializing or deserializing. Keep this in mind when thinking about the runtimes of your commands!~~ Update: The staff has decided that in order to reduce the difficulty of the serialization, you can generally ignore serialization time, except with the caveat that your serialization time cannot depend in any way on the total size of files that have been added, committed, etc. Students are encouraged to hit the original goal if they feel up to it, though!
E. Submission and Grading
Like normal, push your code to submit/proj2 in order to submit. Push to ag/proj2 to submit to the autograder.
Be aware that the public autograder for this project is extremely barebones, and your code will mostly be graded on a secret autograder. The public autograder is essentially nothing more than a sanity check on the most basic commands. This means that in order to ensure your code works, you'll have to test it yourself! I guarantee you that your code will not work if you don't test it thoroughly yourself.
To help you test your own code, we've provided three very simple test cases you can look at, in the file GitletPublicTest.java. These are exactly the tests that will run if you push to ag/proj2. We recommend you base your own tests on these examples. The utility methods this class provides should make your testing much easier. Don't worry about understanding them fully — you can use them just trusting their abstraction.
By the way, you should also try running your code from the command line and use it just like git! Don't only test with JUnit. In addition, if you're using Windows, be sure to test out your code and tests on a linux/mac machine, such as the lab computers. You want to make sure that your code does not only work in a Windows environment, since our autograders will be run in linux.
About grading: because so many of the commands depend on one another, we cannot grade each one separately. Instead, we have to test sequences of commands together. Be aware that if any of the core functionality is broken (namely add, commit, branch, checkout, log), then many of our tests may break, and you will end up with little points. Make sure they work exactly as the spec describes! Although the fringe functionality is more difficult and time consuming to write (like merge, rebase), fewer tests depend on these methods, so they won't impact your grade as much.
For 0.1 points of extra credit, ensure that every one of your methods has a descriptive comment.
F. Stretch Goal: Going Remote
This project is all about mimicking git’s local features. These are useful because they allow you to backup your own files and maintain multiple versions of them. However, git’s true power is really in its remote features, allowing collaboration with other people over the internet.
This project’s stretch goal is to implement some basic remote commands: namely add-remote, rm-remote, push, pull, and clone. You will get this project's gold points from completing them. This stretch goal will be significantly more challenging than the rest of the project: don't attempt or plan for it until you have completed the rest of the project. In fact, I don't even recommend reading the remainder of the spec until you've completed the rest of the project.
Setting Up scp
Okay, have you finished the rest of the project now? Let's go on then. But before describing how the specific remote commands work, let’s first go over the basics of how the commands can interact with the internet.
All of the remote commands should work off scp (or pretend like they do). scp is a terminal command that allows you to copy files back and forth between computers across the internet. Your remote gitlet commands should work on anything that you have scp access to. That means, before beginning coding this part of the project, you should check to make sure you can use scp from the terminal. Note that scp is a unix command; Windows users will have to either use git bash, or use the lab computers for this.
Anyway, you should have scp access to your user account on the berkeley lab computers. For example, try out a command like:
scp [some file] cs61b-[xxx]@torus.cs.berkeley.edu:[some other file]Where [xxx] is your login, [some file] is the name of a file on your local computer, and [some other file] is what you want the file to be named when you copy it onto the lab computers. torus.cs.berkeley.edu is the name of a computer on campus; you can use other ones too, such as cory.eecs.berkeley.edu.
After you do the scp command, you’ll be prompted for your password to log-in to your account on the lab computer.
Unfortunately, it just won’t do to have to enter your password every time you run gitlet’s remote commands. So, we’re actually going to need to take advantage of scp’s password-less login features.
So let’s revise what we said earlier to: Your remote gitlet commands should work on anything that you have password-less scp access to.
In order to get yourself password-less login to stuff over scp, you’ll want to set up an ssh key.
You can look up guides for setting up password-less ssh online. For example, this guide on github has some instructions on creating an ssh key. Only steps 1 - 3 will be relevant to you, though, because you don't want to add the ssh key to your github account; you want to add your ssh key to your user account on the berkeley lab computers. For instructions specifically about the lab computers, you might want to check out inst's help page here (see the sections SSH Public and Private Keys (passphrases) and Password-less Logins (OpenSSH)), though the instructions aren't as clear as github's are.
You can look up other resources too, if these aren't good enough for you. Keep in mind that setting up scp is not supposed to be the difficult part of this project! If you get stuck, ask questions.
All right, have you gotten password-less scp working? Great! Now you should be able to get your gitlet commands to work in Java. Let's move on.
Note: the simplest way to get Java to transfer files over scp is probably just to make Java call terminal commands; though there are more legit ways using scp in Java, you’re not required to use them. That said, please do not just make Java directly call terminal commands in the other portions of the project; take advantage of the file system abstractions that Java offers.
Windows users: If you make Java call terminal commands, it won't use git bash; it will use the regular command line. The is problematic because then you can't use scp. The way to remedy this is to set your command line to be able to use the unix git bash commands like scp. Try to figure out how to do this, and ask if you have questions!
The Commands
All right, now that you've gotten scp working, onto the rest of the project!
A few notes about the remote commands:
- Runtime will not be graded. For your own edification, please don't do anything ridiculous, though.
- All the commands are significantly simplified from their git equivalents, so specific differences from git are usually not notated. Be aware they are there, however.
- Remote commands might fail for internet connectivity issues or if the scp user name and server aren't legit. It doesn't matter what happens in these cases.
- During any commands, it doesn't matter what happens to the working directory on the remote machine at all. The remote machine is only responsible for saving gitlet state and backups.
So now let's go over the commands:
add remote
- Usage:
java Gitlet add-remote [remote name] [user name on server] [server] [location on server to initialize gitlet] - Description: Saves the given login information under the given remote name. Attempts to push or pull from the given remote name will then attempt to use this scp login information and go to the given location to look for a .gitlet folder.
- Failure cases: If a remote with the given name already exists, print the error message:
A remote with that name already exists.Note that you don't have to check if the user name and server information are legit. - Dangerous?: No.
remove remote
- Usage:
java Gitlet rm-remote [remote name] - Description: Remove information associated with the given remote name. The idea here is that if you ever wanted to change a remote that you added, you would have to first remove it and then re-add it.
- Runtime: Should be constant by any significant factors.
- Failure cases: If the given remote name has not been added, print
A remote with that name does not exist.If a remote with the given name does not exist, print the error message:A remote with that name does not exist. - Dangerous?: No.
push
- Usage:
java Gitlet push [remote name] [remote branch name] - Description: Attempts to append the current branch's commits to the end of the given branch at the given remote. Details:
This command only works if the remote branch's head is in the history of the current local head, which means that the local branch contains some commits in the future of the remote branch. In this case, append all of the future commits to the remote branch. Then, move the remote branch head to the front of the future commits (so it's head will be the same as the local head). This is called fast-forwarding.
There is one additional use case of push: If there is no gitlet system currently on the remote, push will actually initialize it there. Just copy over the entire gitlet state to the remote machine. Ignore the given branch name in this case.
Or, if the gitlet system on the remote machine exists but does not have the input branch, then simply add the branch to the remote gitlet.
- Failure cases: If the remote branch's head is not in the history of the current local head, print the error message
Please pull down remote changes before pushing. - Dangerous?: No.
pull
- Usage:
java Gitlet pull [remote name] [remote branch name] Description: Attempts to append commits from the remote branch onto the end of the current local head. There are three cases:
- The remote branch head is in the history of the local head. Then there is nothing to do. Please print the error message
Already up-to-date. - The local head is in the history of the remote branch. Gitlet should copy the new commits to local head, then reset to the end of the copied commits.
- Neither head is in the other’s history, though they share a common ancestor. First, copy all of the remote commits since the common ancestor onto the front of the local branch (this is not exactly a rebase, because the copied commits should not inherit files from you local commits. Also, the copied commits must keep their original ids). Then, append a new commit to the front that adds back in your local changes since the common ancestor. If there are conflicts with the remote commits you just pulled down, then go with your local commits. Finally, reset to the new commit.
- The remote branch head is in the history of the local head. Then there is nothing to do. Please print the error message
- Failure cases: Enumerated in description. Also: if the remote gitlet does not have the given branch name, print the error message
That remote does not have that branch. - Dangerous? Yes!
clone
- Usage:
java Gitlet clone [remote name] - Description: Copies the .gitlet directory at the remote's address into a new folder named the same as the remote name. Also takes the snapshot of files in the head's commit and puts them in the folder.
- Failure cases: If a remote with the given name does not exist, print the error message:
A remote with that name does not exist.And, if there is no gitlet system initialized at the remote's location, it doesn't matter what happens. - Dangerous?: No, unless there is already a folder on your computer named the same as the remote name. Don’t bother warning about this.
There is one final note to make about the remote commands. If you think about the remote commands hard enough, you'll realize that using an arbitrary id scheme won't work in the hypothetical scenario where you're collaborating with a friend using a remote. If you and your friend make different commits on each of your local machines that end up with the same id, then the remote commands will break.
One way real git solves this problem is that each commit's id is generated from its contents and metadata. The id number is not simply an arbitrary id number, but a hash. So, if you and your friend make different commits, they have to end up with different ids.
So to do the remote commands, please change your arbitrary id scheme to a hashing id scheme. The hashes should be determined at least from the commit's message, time, and hash of its parent (if it has one). This means it's okay to get collisions in a scenario where you have two commits that have the same message, time, and history. However, it is imperative you don't get collisions otherwise. To ensure this, look into using an existing hashing algorithm, rather than writing your own. Also, to help you avoid collisions, commit ids can be long hex numbers instead of just integers.
G. Acknowledgements
Thanks to Josh Hug, Sarah Kim, Austin Chen, Andrew Huang, Yan Zhao, Matthew Chow, and especially Alan Yao for providing feedback on this project. Thanks to git for being awesome.
This project was largely inspired by this excellent article by Philip Nilsson.
This project was created by Joseph Moghadam with the help of Alicia Luengo.